
This is part of my series on learning to build an End-to-End Analytics Platform project.
TLDR; I’ve been working on upping my Python game 🐍. This post we got started by creating a Python virtual environment. Then built a sense HAT data logger with the Raspberry Pi to write the readings to a local file on the Pi.
Going virtual 💾
If you are wondering how I am writing code remotely on the Pi, go check out setting up remote development on the Raspberry Pi using VS Code. We are using the same approach here to get connected and working on our Pi.
Part of this journey is growing my skills. I chose Python as a programming language. Not diving into too many details. It just gives a range of capabilities (web through to machine learning) with a single language. No need to switch too much while learning all the techs in this series. Works for me.
While upping my Python game I came across something called virtual environments. A little primer on virtual environments. I think I have a reasonable grasp on how to start using them for better package management.
Not going full virtualenvwrapper yet though. “Hey, I just met you and this is crazy, but here’s my bookmark, browse it later maybe. #justsayin’
To that note, let’s set up a virtual environment. First, check our Python versions on the Pi:
python3 --version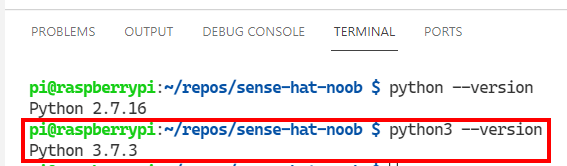
We have Python3 installed on the Pi. That means we should have the venv capability built-in. Let’s give it a whirl!
python3 -m venv noobenv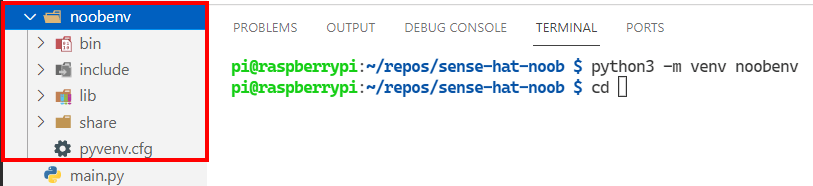
When we do that a new folder gets created in our repo. It has a bunch of folders and files related to the “inner workings” of how virtual environments work <- science 👩🔬.
Logging the things 🪵
The goal here is that we have an IoT device that is capturing data from the sensors. It has a bunch of sensors we are going to use, which is exciting. Honestly, the more I work with it, the more amazing it is to me.
from sense_hat import SenseHat
from datetime import datetime

sense = SenseHat()

def get_sense_reading():
    sense_reading = []
    sense_reading.append(datetime.now())
    sense_reading.append(sense.get_temperature())
    sense_reading.append(sense.get_humidity())
    sense_reading.append(sense.get_pressure())
    sense_reading.append(sense.get_orientation())
    sense_reading.append(sense.get_compass_raw())
    sense_reading.append(sense.get_accelerometer_raw())
    sense_reading.append(sense.get_gyroscope_raw())

    return sense_reading
We create a function (get_sense_reading) that we can call repeatedly. Then use the SenseHat functions (e.g. get_temperature) to get readings from the different sensors. To get them all in a single object/row, we can use a list (sense_reading). Then append each reading to the list. Once we have them, we return the list object.
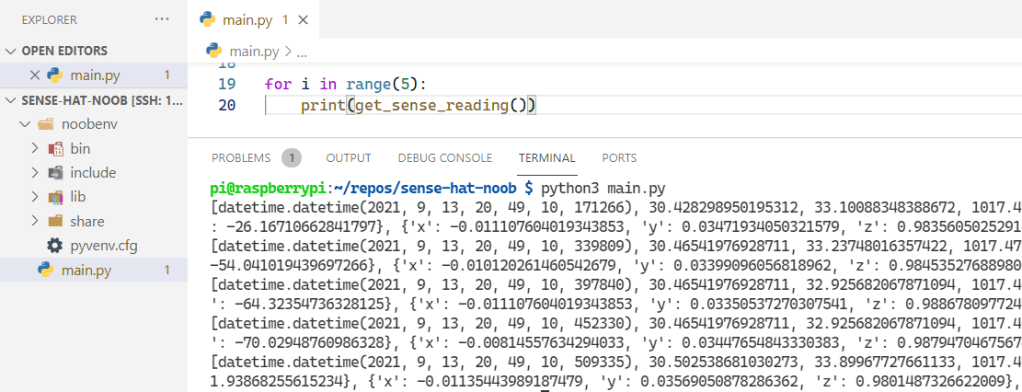
We add a for loop to our code to call the get_sense_reading function a few times are print the results to the terminal window. We can run the program (main.py) by calling the Python 3 interpreter and passing the file name to it. That loads the code, executes the loop, prints the results.
python3 main.pyNow to add data to a file on the device. We’ll use a CSV for now, then adapt it later based on our needs. We can use the the sense_reading object returned by the get_sense_reading function and write that to the file using the csv library.
from csv import writer

timestamp = datetime.now()
delay = 1

with open("logz.csv", "w", newline="") as f:
    data_writer = writer(f)
    data_writer.writerow(['datetime','temp','pres','hum',
	                  'yaw','pitch','roll',
                      'mag_x','mag_y','mag_z',
                      'acc_x','acc_y','acc_z',
                      'gyro_x', 'gyro_y', 'gyro_z'])

    while True:
        data = get_sense_reading()
        difference = data[0] - timestamp
        if difference.seconds > delay:
            data_writer.writerow(data)
            timestamp = datetime.now()
We start with a timestamp because we want to calculate a delay interval, say 1 second, between writes to the file. The open the file and write a header row (writerow) to the file. We use a while loop to collect readings, then once we exceed the delay interval, write the row to the file. We need to update the timestamp otherwise we will write a row on every pass after we exceed the timestamp the first time.
Testing seems to be working and we can log data to a file on the device. VS Code integrated terminal really is fantastic at running multiple and side by side shell/terminal windows.

Awesome! It works. We have a program logging data to a csv file at a defined interval. Tail simply prints end of file content. A few lines is all we need to double check things are working. Last thing left.. shut down the Pi remotely. Usually I would use a shutdown command. I gave a new command a try “Halt”.
sudo halt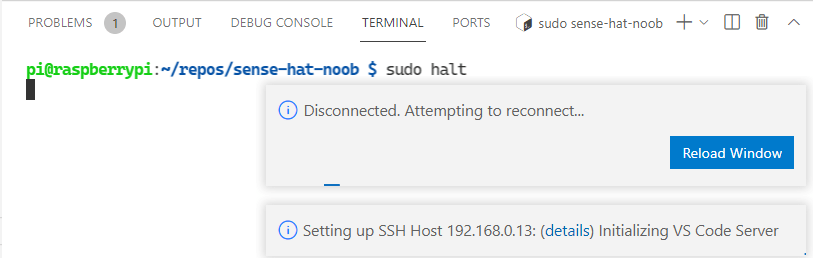
Looks like that worked 🙂 The connection got terminated and VS Code detects that, and tries to reconnect. Pretty slick. We managed to start putting new Python skills to use. Learnt how to create a virtual environment for better package management. Then collecting and writing telemetry from the SenseHat to local storage on the Pi.
That’s it for now.
🐜
