End-to-End Analytics Platform – GitHub Actions

This is part of my series on learning to build an End-to-End Analytics Platform project.

TLDR; This post we got started with GitHub Actions. Test drove Excalidraw for diagraming. While building the workflow learnt Yaml in y minutes. Started with a simple starter workflow. Worked through deploying Bicep files by using GitHub Actions.

Automate construction 🚧

Now that we have the code set up and we can deploy it manually it’s time to autobot automate. We are going to use GitHub Actions for Azure to work on building our Continuous Integration/Continuous Deployment pipeline.

What we are looking to create is a workflow to automate tasks. Actions are event-driven. An example is “Run my testing workflow when some creates a pull request.”. What makes up a workflow? Queue Intro to GitHub Actions. To start off the thinking I get to test out a pretty fantastic open-source whiteboard tool, with tons of potential, called Excalidraw. *Inner voice screaming… “Excalidraw, I choose you!”* ⚔️

Working the flow.
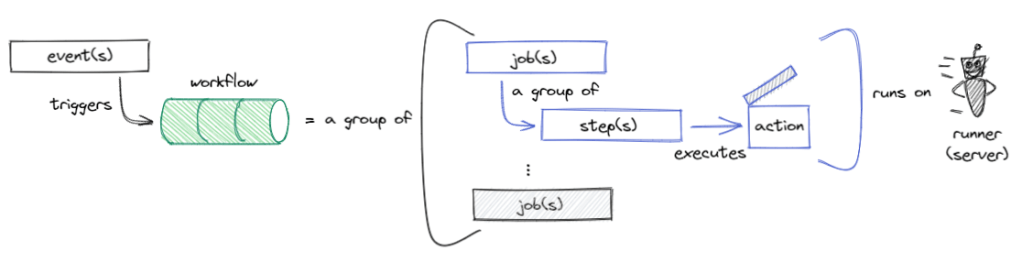
  • A workflow is an automated procedure that you add to your repository.
  • A job is a set of steps trigger by event/webhook or scheduled that execute on the same runner.
  • A step is an individual task that can run commands in a job.
  • Actions are standalone commands that are combined into steps to create a job.
  • A runner is a server that has the GitHub Actions runner application installed.

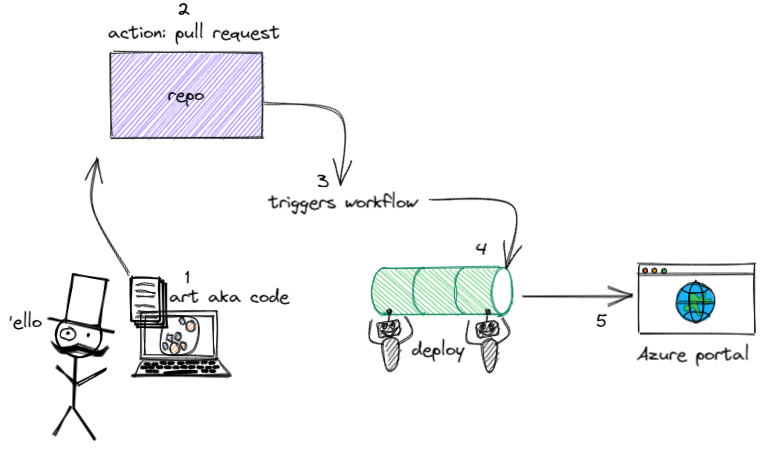
Now that we know some basics, let’s dive in and give it a go. Here is the plan for what we want to achieve with an accompanying artistic depiction:

  1. Develop some code, commit to our branch, push the changes
  2. Then complete a pull request and merge the changes
  3. The GitHub action triggers the workflow
  4. The workflow runs our jobs and steps to deploy the resources
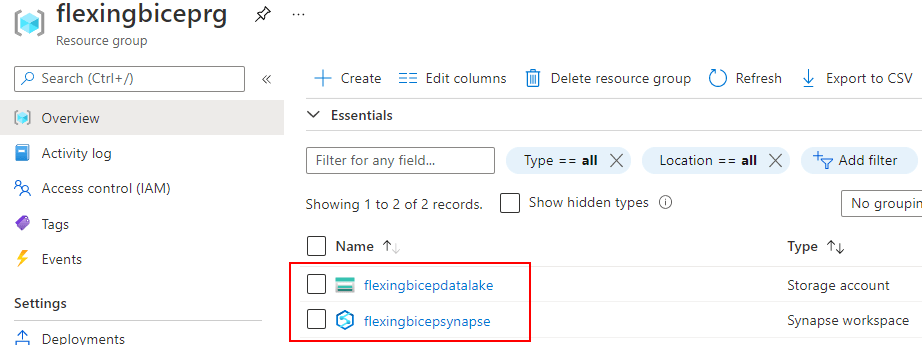
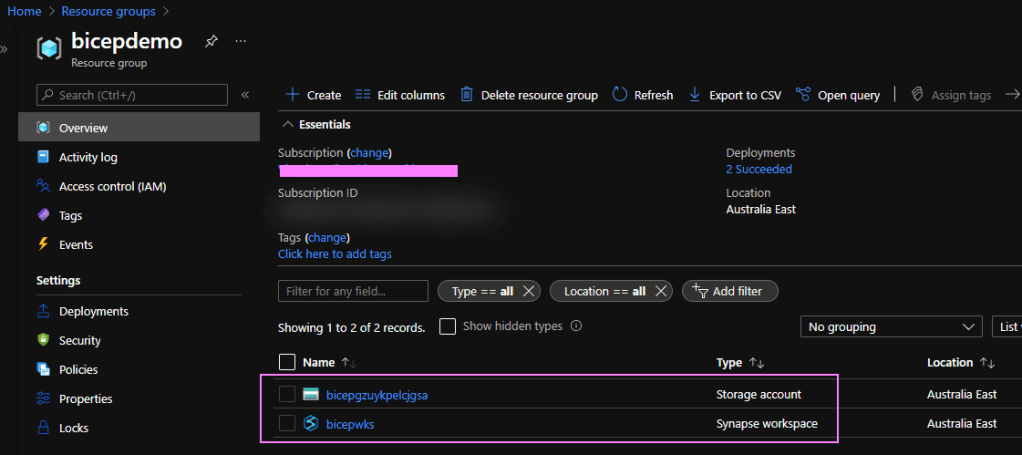
  5. Validate the resources got deployed to Azure
Hard at work.

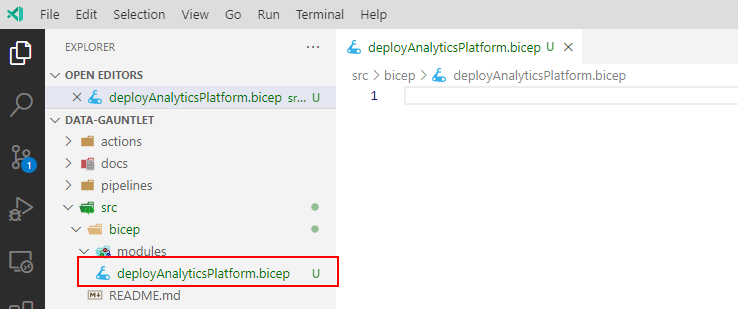
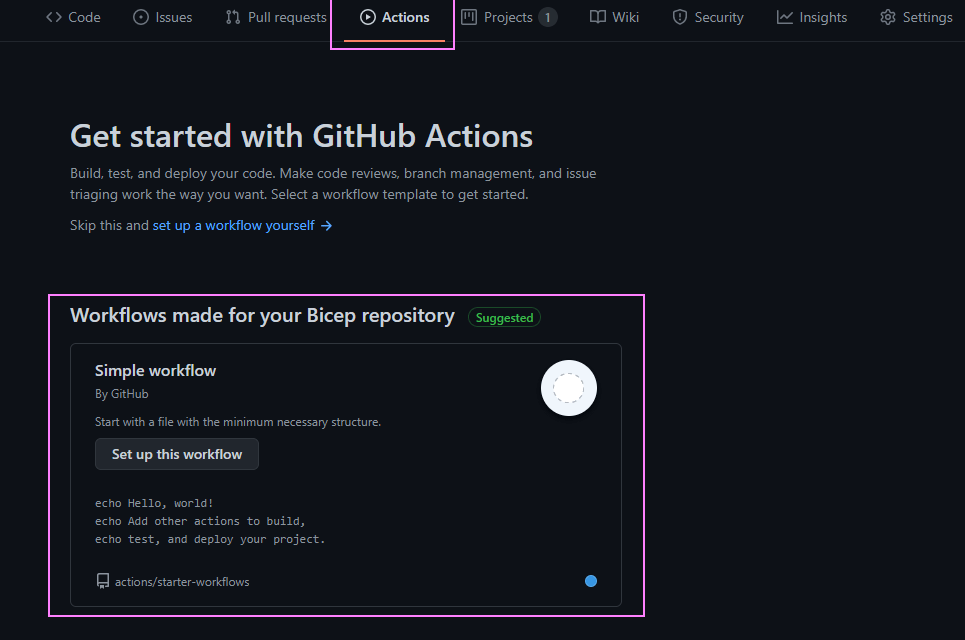
Let’s create our first GitHub Actions workflow. Navigate to the ‘Actions‘ tab in our repo. We get a few workflow templates we can use. Let’s use the ‘Simple workflow‘ by using the ‘Set up this workflow‘ button.

And Action 🎬

GitHub actions use YAML syntax for defining events, jobs, and steps. When we created the workflow, GitHub added a new .github/workflows directory to our repo. It created a new .yml file which I renamed to build.yml in that directory. For those of us that don’t speak YAML fluently, we can learn x(yaml) in y minutes 🧪.

Yay YAML!

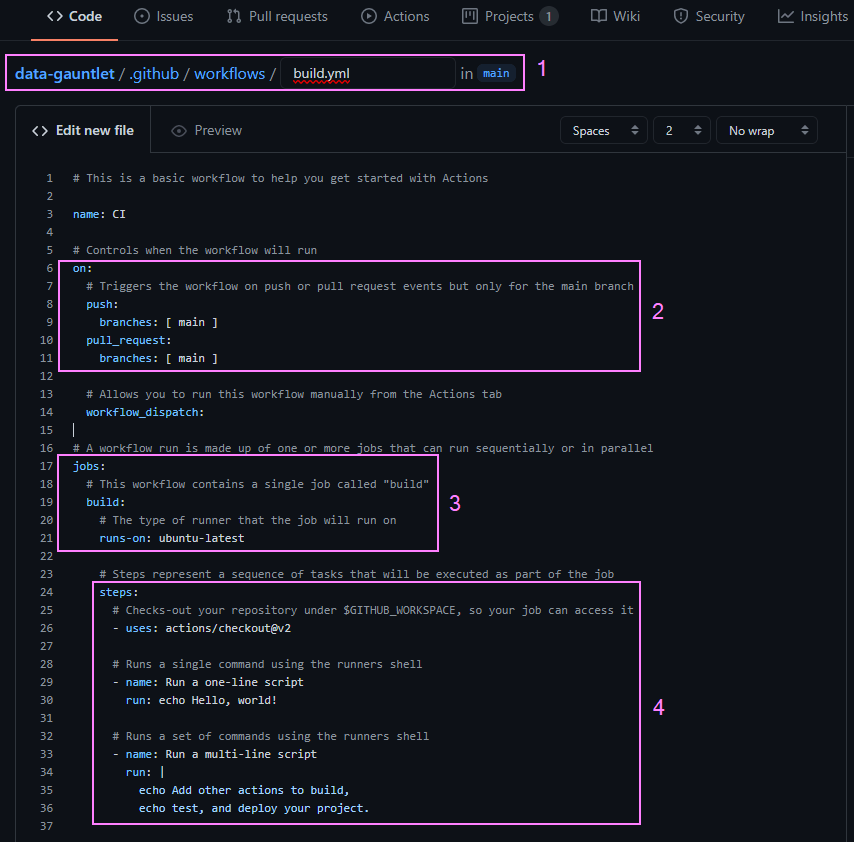
A brief summary of what is going on here:

  1. Our new YAML file and path was added to our repo
  2. We can see our workflow is triggered on a push or pull request actions to our main branch
  3. We have one job that runs on a Ubuntu runner server
  4. We have three demo steps
    1. Uses a packaged action from https://github.com/actions/ called checkout to checkout our repo
    2. Runs a single line script in the runners shell
    3. Runs a multi-line script in the runners shell

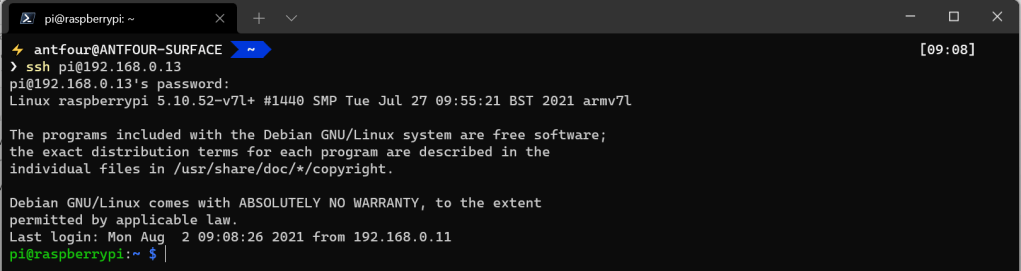
That’s a good enough starter template. From this point on, for brevity, I followed the documentation to deploy Bicep files by using GitHub Actions. That covers setting a deployment service principal (My choice, Windows Terminal Prettified), configuring GitHub secrets, and the sample workflow to deploy Bicep files to Azure. Once that is all set up, we have a workflow that looks like this:

Note: Though not the recommended practice. I adjusted the scope of my service principal to a subscription level. For my testing I would like GitHub Actions to create resource groups using my Bicep file definitions not the CLI. So my command was a little different:

az ad sp create-for-rbac --name {myApp} --role contributor --scopes /subscriptions/{subscription-id} --sdk-auth

After reading the Azure/arm-deploy documentation and the exampleGuide

Adjusted

To commit our changes, just use the ‘Start commit’ button in the top right corner. I created a new branch from here for the change, then just finished the pull request from there, merging our changes to the main branch.

Committing to it

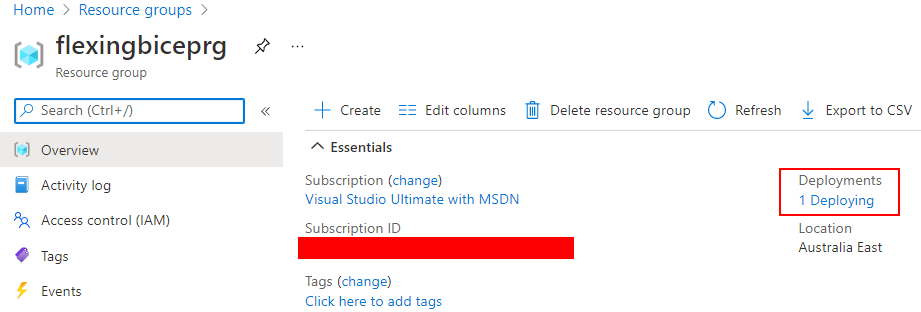
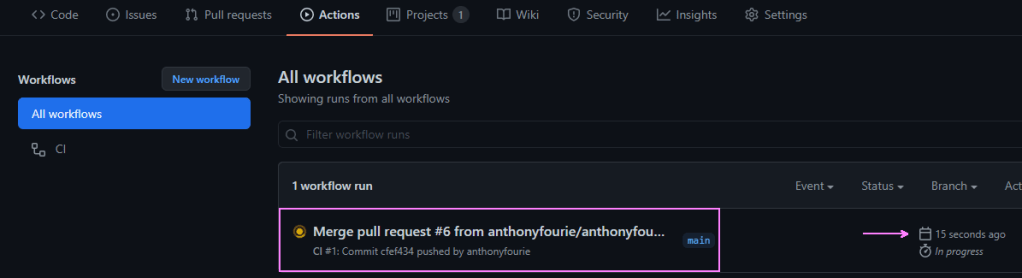
Remember our triggers? On pull_request to main? That kicks off our pipeline 😎

Behold! It lives!

Full disclosure: It failed. lol.

  • I got an error “missing ‘region’ parameter” for the Azure/arm-deploy action
  • I adjusted the file path for the ‘deployAnalyticsPlatform.bicep’ file from root to the src/bicep directory.
  • I also modified the trigger to only fire when a push is done to the main branch. That prevents us running the pipeline twice, once for the pull request, then again when the merge us run.

So we learn 😉

Re-calibrating

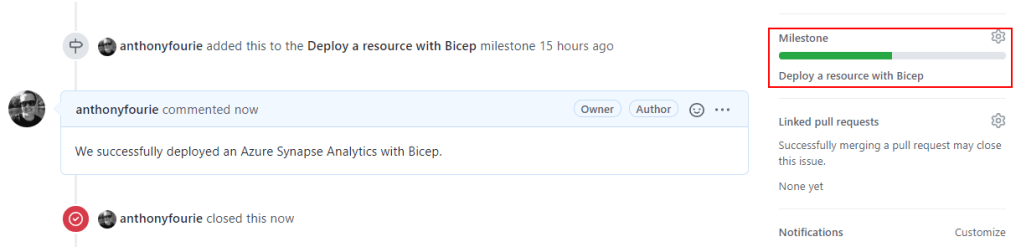
Quick update to the code. Run through the GitHub flow again and we are back in business. When we navigate into the Action we can see a bunch of information. Why the workflow was triggered. What’s the status. Which jobs are running.

In flight

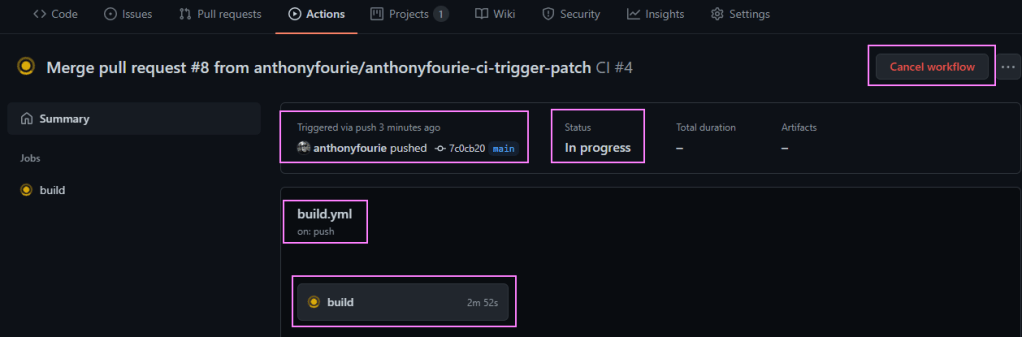
When we click on the job, we can drill into the runner logs as well. This helps a bunch in debugging workflows. An example, is that we have a property for the storage account which is read-only:

Only reading errors

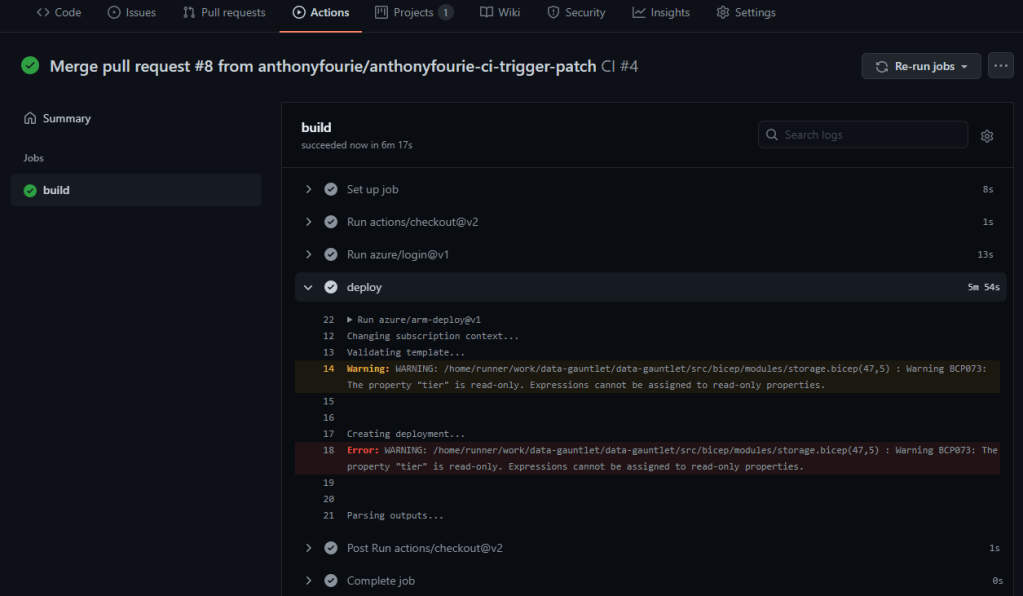
The deployment succeeded though which I think is great progress!

Deployed with action!

That’s it! All done. Explored GitHub actions. Created service principals and GitHub secrets. Learnt some YAML. Broke and fixed our workflows. Then successfully deployed resources from Bicep code.

🐜

P.S. A really simple video that also helped me rapidly establish some key points quickly was: GitHub Actions Tutorial – Basic Concepts and CI/CD Pipeline with Docker

End-to-End Analytics Platform – IoT with Pi 🥧

This is part of my series on learning to build an End-to-End Analytics Platform project.

TLDR; My very first Pi and sense HAT was graciously gifted to me by Jonathan Wade (LinkedIn). I assembled it. Tried to go headless. Ended up adding a head because reasons. Ran through initial setup and updates. Configured OpenSSH on Windows and SSH on the Pi to get to the headless state.

I got gifted something amazing! Yup, my first Raspberry Pi. Not only that, a Sense HAT too! Now for many people that might mean much, but this is a pretty big moment for me. To save you from another unboxing experience I took the liberty by doing that privately and cut to the end. Behold! The unboxed product:

Raspberry Pi device parts on a table.
Bare metal

Looking through what we have here. The Raspberry Pi 4 Model B (top left), the Raspberry Pi Sense HAT (bottom middle), a SanDisk 32GB microSD card, some spacers, screws, power cable, and a HDMI to mini HDMI cable.

Raspberry Pi device and Sense HAT assembled
Fresh off the factory floor

Assembling the unit was really simple. Just a quick look at the Sense Hat board and we can see some amazing things:

  • Air Pressure sensor
  • Temperature and humidity sensor
  • Accelerometer, gyroscope, and magnetometer
  • 8×8 LED matrix display
  • Even a small joystick!

This device is pretty EPIC and it’s not even powered it on yet. So many things I haven’t ever worked with but can’t wait to try and figure them out.

Raspberry Pi Sense HAT LED lights on
Like a diamond 💎

Next up power and networking. The moment I connected the power a rainbow 🌈 filled the room. A sign of a pot o’learnings 🪙 to be found at the end of this experience.

Nice! Now we have the whole unit assembled. What’s the plan? Well, the thinking is to use this to deploy and run Azure SQL Edge on it. Why? A few reasons:

  • I have never worked with a Raspberry Pi
  • I haven’t really work on Linux at all
  • I have never done any work with Azure IoT solutions, or IoT at all for that matter
  • I do know Azure SQL reasonably well, though not Azure SQL Edge
  • Azure SQL Edge has a bunch of interesting things data streaming, time series analysis, and ONNX AI/ML capabilities. None of which I have worked with.

I didn’t connect any screen at this stage. It’s known as “headless”. We need a way to connect to the Pi though. We have the Windows Terminal and found that we can use SSH to connect to the Pi from a Windows 10+ machine.

Terminal with OpenSSH installation
SSHHHHHH…

That didn’t work. Apparently SSH has been disabled by default. Considering I don’t have a microSD card reader, it’s time to put a “head” on nearly headless Pi and connect a screen 🖥️. The HDMI cable, a keyboard, and a mouse later and we are connected. I ran through the setup, updated the password, downloaded the latest updates, then set up SSH. There are other security best practices that I am going to follow as well after this post. Then tried to connect again and…success!

Terminal with successful SSH connection message
Connection suck seeds! 🌱

Next I shut the Pi down. Disconnected the screen, mouse, and keyboard. I’m going to try work on this device remotely so I don’t need those peripherals right now.

Now that we have an IoT device I am going to start exploring if there are any open data sets that I can start using and feed some of the device telemetry into the end-to-end analytics solution as a cohesive project. We are going to set up additional services in our solution to support IoT device which will be fun.

Until next time.

🐜

End-to-End Analytics Platform – Bicep What-If deployment

This is part of my series on learning to build an End-to-End Analytics Platform project.

TLDR; After I refactored my code to use modules I found that Bicep supports ‘What-If’ operations which explain what the code is going to do before deploying it. This post I do a short test on that. Found an issue not showing Azure Synapse resource creation. Then browsed the Bicep GitHub repo to search issues related to What-If operations. Didn’t find what I was hoping for, so logged my first public GitHub issue 😁.

Update: The issue we encountered seems to be related to another preflight improvement which is being worked on but is a “…bit of a gnarly, low level issue so please be patient 🙂. I was amazed to see how quickly Bicep the team responded on this.

What happens when I push this button? 🤔

So after my previous post on factoring in some Bicep best practices for code reuse I noticed that Bicep supports ‘What-If’ operations.

az deployment sub create --name '<name of deployment>' --location '<location name>' --template-file '<path to bicep file>' --confirm-with-what-if

Side note: I had to change the VS Code theme to save us all from the agony of lime green on light grey background reading.

What’s nice is we get a breakdown of changes that we are about to apply to our environment. I think that is awesome.

Terminal output of a Bicep deployment what-if operation.
I have one question. Explosions? 🧨

Yes, for the eagle-eyed reader, I realised my storage account name is an Azure Region name hahaha 😂

Looking at the terminal output, reading top to bottom, I can see:

  • We are about to deploy at the subscription scope.
  • We are deploying a Azure Data Lake Gen2 Storage Account with blob container and all their configuration goodness.
  • We are deploying an Azure Synapse… wait a minute…

What was weird was that I didn’t see the Synapse Workspace. I checked the deployment details/output and it was there.

Azure portal deployments screen.
Deployed

I wondered if the reason it didn’t output the Azure Synapse Resource during the What-If was because I didn’t define any output variables for it which I did for the storage account.

Bicep output code.
Putting more out.

I updated my variables, added output variables for my synapse.bicep module, then ran the What-If again. Aaaaand…. nothing changed. Considering Bicep is an Open Source project on GitHub we get to search for issues with ‘What-If’ operations. So, we get to create a issue 😁 Taking the things learnt over the past few posts on

GitHub issue summary.
de bug 🐛

That’s it. Done. Created our first public issue: what-if operation doesn’t seem to include all bicep defined or created resources · Issue #3682 · Azure/bicep (github.com).

The what-if behaviour doesn’t block us at this stage. The deployment works so at this point I think we are set for the next section to work on getting this into a GitHub Actions pipeline.

🐜

End-to-End Analytics Platform – Infrastructure as Code (IaC)

Photo by John Nail from Pexels

This is part of my series on learning to build an End-to-End Analytics Platform project.

TLDR; I set up a GitHub milestone with two issues. Started working with the Bicep language to build Azure resources. It’s basically a language that simplifies building Azure Resource Manager (ARM) templates. I installed the Bicep tooling. Defined resources using things like parameters, modules, and others using an ARM template guide. Used Bicep build to generate an ARM template from the Bicep file. Experimented with Bicep decompile to generating a Bicep file from an ARM template. Created my first gist to share some code. Lastly, used the Azure CLI to deploy the Bicep resource. Also… found a Bicep playground 🤸‍♂️ Just saying..

Prepping for Dev 👨‍💻

We are using the development flow from my previous post. Not enough time? Check out the GitHub Flow.

We need a starting point to build out our end-to-end analytics platform. We are going to attempt to deploy a Azure Synapse Analytics and required services with Bicep templates. This gives us two key capabilities:

  • Data Lake Storage to store our data
  • Pipelines to support orchestration and batch ingestion of data

Let’s get started. We created a new issue, updated the project board, set up our new branch in GitHub. Pulled the updates locally. Then checkout to that new branch.

Getting the hang of issues.

In this post though I wanted to learn about GitHub Milestones. They make it easy track a bunch of related issues. They also have convenient progress tracking built in. So I added another issue. Then made my way to the milestone page from the issues tab:

More issues.

Used the ‘New milestone’ button to create a new milestone. Gave it an name and filled in the details.

A milestone. Yep.

After that jump back to the issue and assign it to the milestone we just created. Notice that the milestone has a progress bar.

I will walk 500 miles.

Nice. Issues, milestones, branches, in the flow. Time to get to building things.

Building Biceps 💪

To work with Bicep files we need to install the Bicep tools (Azure CLI + Bicep install, VS Code Bicep Extension) . Once that’s done, we add our first .bicep file 🦾 to the project. Remember to check which branch you are on locally.

Flexing our first Bicep file.

Stepping back, according to the documentation, Bicep is a domain-specific language (DSL) that uses declarative syntax to deploy Azure resources. We not covering every area of Bicep here. The documentation does a good job of that. There are a few things that we am going to use in this post:

There are a bunch of other capabilities that you can explore from loops, functions, and more. So much goodness, so little time… someday maybe.

Now to start building out our resources. Let’s start with some parameters:

Intellisense integration for Bicep development.

Yes please! Intellisense for the win! I also added a comment which is being kind to my future self. Now let’s add a resource. The intellisense really helps a bunch to expedite development. We can get to the resource, the API version, and more using the Tab key. Another nice thing is using Ctrl+Space to expand more options, properties, and more:

Building a Bicep resource.

We have some basic building blocks for figuring out how to create a resource. Next I expanded the declaration with more resources, parameters, comments, and properties using the template documentation and Azure-Samples.

Note: You could try create a Synapse Analytics Workspace using the portal and grab the template just before you create it as well.

Notice that you can reference the parameters in the resource declaration which helps with code reuse. I added a deployment condition to control what services get deployed. The code is in an intermediate state to showcase that I can use strings or parameters to assign values. I’ll gist show you what I did 😉:

/*Global parameters*/
param resLocation string = resourceGroup().location
/*This controls if we deploy the resource our not*/
param deployDataLake bool = true
param deploySynapse bool = true
/*Resource specific parameters – Synapse Analytics*/
param synapsWorkspaceName string = 'fancy-name'
param synapseSqlAdministratorLogin string = 'majestic-username'
param synapseSqlAdministratorLoginPassword string = 'your-complex-password'
/*Create a data lake storage account which we use as the Synapse Analytics default data lake*/
resource datalake 'Microsoft.Storage/storageAccounts@2021-04-01' = if (deployDataLake == true) {
name: 'fancy-name'
location: resLocation
sku: {
name: 'Standard_LRS'
tier: 'Standard'
}
kind: 'StorageV2'
properties: {
isHnsEnabled: true
supportsHttpsTrafficOnly: true
accessTier: 'Hot'
networkAcls: {
defaultAction: 'Allow'
bypass: 'AzureServices'
virtualNetworkRules: []
ipRules: []
}
encryption: {
services: {
blob: {
enabled: true
}
file: {
enabled: true
}
}
keySource: 'Microsoft.Storage'
}
}
}
/*
I built this child resource by wroking my way back through these templates: https://github.com/Azure-Samples/Synapse/tree/main/Manage/DeployWorkspace/storage
It get's a little tricky, but we are building a dependency chain of parent-child resources. e.g. Storage account -> Blob -> Container
*/
resource blobService 'Microsoft.Storage/storageAccounts/blobServices@2021-04-01' = if (deployDataLake == true) {
parent: datalake
name: 'default'
properties: {
cors: {
corsRules: []
}
deleteRetentionPolicy: {
enabled: false
}
}
}
resource container 'Microsoft.Storage/storageAccounts/blobServices/containers@2021-04-01' = if (deployDataLake == true) {
parent: blobService
name: 'workspace'
properties: {
publicAccess: 'None'
}
}
/*Create a Synapse Analytics workspace*/
resource synapseWorkspace 'Microsoft.Synapse/workspaces@2021-04-01-preview' = if (deploySynapse == true) {
name: synapsWorkspaceName
location: resLocation
identity: {
type: 'SystemAssigned'
}
properties: {
defaultDataLakeStorage: {
/*I used the datalake resource and can use dot notation to reference information about it. This establishes a dependency.*/
accountUrl: datalake.properties.primaryEndpoints.dfs
filesystem: container.name
}
sqlAdministratorLogin: synapseSqlAdministratorLogin
sqlAdministratorLoginPassword: synapseSqlAdministratorLoginPassword
}
resource workspaceFirewall 'firewallRules@2021-04-01-preview' = {
name: 'allowAll'
properties: {
startIpAddress: '0.0.0.0'
endIpAddress: '255.255.255.255'
}
}
}

It’s a basic Synapse deployment. The goal is to start deploying using Bicep. We can add things like RBAC assignment for storage access, network configurations on the storage firewalls, and others.

To ship it 🚢 we can use the Azure CLI in the VS Code integrated terminal. The deployment is pretty simple. Login into your Azure subscription with the Azure CLI. Set your subscription context.

az login
az account list
az account set --subscription 'your-subscription-name-or-id'

Create a resource group in which we want to deploy the resources defined in the .bicep file. Bicep can do this which we will get to another day.

az group create --resource-group 'your-resource-group' -location 'azure-region'
Success.

Deploy the resources at a resource group level specifying the Bicep file path as our template file. Once you submit the terminal will indicate that the deployment is running. We should see a JSON summary output when it’s done similar to our resource group deployment.

az deployment group create --resource-group 'your-resource-group' --template-file 'path-to-your-bicep-file'
Deploying robots.

Checking the deployment in the Azure Portal is simple. Navigate to the resource group. On the ‘Overview’ page, there is a ‘Deployments’

Deployments are deploying.

If you keep following the trail, you end up at the deployment detail screen:

It’s working… It’s working! 🚀

We can validate the resources are deployed in the Azure Portal:

Deployed!

Let’s close off one of our issues and see what it does to the milestone:

Milestone achieved ✅

Awesome! To clean up, just delete the resource group 👍

az group delete --resource-group 'your-resource-group'

Interesting finds

Bicep has nice capabilities for users coming from an ARM background is that you can use the Bicep build to have it build the ARM template 😉.

az bicep build --file 'path-to-your-bicep-file'
Building ARMs from Biceps lol

If you have ARM templates, you can try out the Bicep decompile functionality to TRY (it’s not perfect, so no guarantees) convert your ARM templates to Bicep files.

az bicep decompile --file 'path-to-your-bicep-file'

Wow! Another lengthy post. Thanks for sticking around. We covered some serious ground. We learnt a bunch and kept building a foundation for our future work. Future posts we can tackle things like modules, advanced resource deployments, and deploying using GitHub actions which should be fun.

🐜